Microlink hair extensions are experiencing a surge in popularity, and it’s easy to see why. These semi-permanent extensions deliver a remarkably natural look without the heat damage, glue, or chemical adhesives that come with other methods. Whether you’re a stylist looking to expand your service offerings or someone curious about DIY installation, microlink hair extensions offer flexibility, durability, and beautiful results. One of the biggest advantages? They’re perfect for beginners interested in learning professional-level installation techniques. At The NiCa Collection, we’re committed to helping you find premium quality hair that works with any installation method, including the increasingly popular world of microlink extensions.
What Are Microlinks?
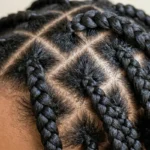
Microlinks, also called microbeads or micro-links, are small, lightweight cylindrical beads (usually made of silicone-lined aluminum or plastic) that attach individual strands of extension hair to your natural hair. Instead of gluing, sewing, or using heat, microlinks work by clamping down onto your natural hair strands using a specialized plier tool.
Here’s the basic concept: A thin strand of your natural hair is threaded through a microbead, and the bead is then clamped or crimped to secure both your natural hair and the extension hair inside. This method allows your natural hair to grow freely while the extensions remain securely attached at the base. The result? Microlink hair extensions that move naturally with your hair, create minimal tension, and cause virtually no damage when installed and maintained properly.
What makes microlinks different from other extension methods is their flexibility and reusability. The same strands of extension hair can be removed, the microbeads repositioned, and the extensions reinstalled, making them a cost-effective long-term investment for anyone serious about extended, voluminous hair.
Why Choose Microlink Hair Extensions?
Microlink extensions have become a favorite among stylists and clients alike for several compelling reasons:
- Natural Finish: Microlinks create an incredibly natural appearance because they attach to individual strands of hair. There’s no visible weft line, no obvious seams, and no telltale sign that you’re wearing extensions. The extensions move and flow exactly like your natural hair.
- No Glue or Heat Damage: Unlike fusion extensions (which use heat) or tape-in extensions (which use adhesive), microlinks require neither. This means zero risk of heat damage to your natural hair and no chemical adhesives that can weaken or irritate your scalp. Your hair stays healthy during the wearing period.
- Full Scalp Access: Because microlinks don’t create a weft across your scalp, you maintain full access to your entire head. This makes shampooing, conditioning, scalp treatments, and regular hair care significantly easier than with other semi-permanent methods.
- Reusable Hair Investment: When you remove microlink extensions, the extension hair remains intact and undamaged. You can reuse the same hair multiple times (with proper care and repositioning), making it more economical over time compared to disposable extension methods.
- Beginner-Friendly Installation: While microlinks do require some learning and patience, they’re far more beginner-accessible than permanent sew-in methods. With the right tools and guidance, many people successfully install their own microlinks at home.
- Movement and Comfort: Microlinks allow natural hair movement because they’re not permanently bonded or sewn. Your hair can move freely, reducing tension and the risk of traction alopecia (hair loss from prolonged pulling).
- Styling Flexibility: Once installed, microlink extensions can be styled, cut, colored, and heat-styled just like natural hair. You’re not limited in how you can wear your hair.
Types of Microlink Extensions
Not all microlinks are installed the same way. Here are the primary methods you’ll encounter:
I-Tip Method
The I-Tip (individual tip) method involves attaching extension hair strand-by-strand to small sections of your natural hair using microbeads. This is the most common microlink installation method.
How it works:
- Individual strands of extension hair have a pre-glued tip
- A small section of natural hair is isolated
- The extension is threaded through a microbead
- The bead is clamped shut using specialized pliers, securing both the natural hair and the extension
Best for:
- Those wanting maximum customization
- Clients with medium to thick hair
- Anyone seeking a lightweight, natural look
- DIY installers who want more control
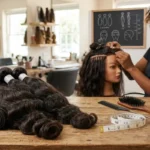
Microbead Weave Method
The microbead weave is a braidless sew-in alternative that uses microbeads as anchors instead of traditional thread. Your natural hair is braided into small cornrows, and extension wefts (multiple strands sewn together) are then anchored to these braids using microbeads.
How it works:
- Natural hair is cornrowed into small sections
- Extension wefts are positioned along the braids
- Microbeads are placed at intervals and clamped to secure the weft
- The result is a durable, full-coverage installation
Best for:
- Those wanting full, voluminous coverage
- Clients with naturally textured hair
- People seeking longer-lasting results
- Full head installations
Tools Needed for Microlink Installation
Before you begin your microlink journey, gather these essential tools:
Primary Tools:
- Microbeads (silicone-lined aluminum or plastic, various sizes)
- Microbead pliers (specialized crimping tool)
- Loop tool (for threading hair through beads)
- Sectioning clips (to organize hair into manageable sections)
- Wide-tooth comb (for detangling without breakage)
Secondary Tools:
- Straightener or curling iron (for blending and styling)
- Scissors (for trimming to blend with natural hair)
- Hair sectioning spray (optional, for easier parting)
- Mirror (preferably a full-length mirror for better visibility)
- Rubber bands (for securing unmounted sections)
Optional but Helpful:
- Extension organizer (to keep hair sorted by length and type)
- Hair clips (for holding sections while working)
- Blow dryer (for styling after installation)
Many of these tools are inexpensive and will last through multiple installations, making the upfront investment minimal.
Step-by-Step Guide to Install Microlink Hair Extensions
Installing microlink extensions is a multi-step process that typically takes 2–8 hours, depending on hair volume, density, and desired coverage. Take your time with each step, as rushing leads to mistakes.
Step 1: Prepare Your Hair
Start with a clean, dry foundation. Your hair must be completely tangle-free and free from product buildup for microlinks to hold securely.
How to prepare:
- Wash your hair with clarifying shampoo 24 hours before installation (don’t install on freshly washed, slippery hair)
- Allow hair to completely dry
- Comb through thoroughly from roots to ends using a wide-tooth comb
- Use a detangling spray if needed for stubborn knots
- Blow-dry hair straight or to your desired texture
Why this matters: Clean, dry, detangled hair ensures microbeads sit flush against your scalp and extensions stay secure. Product buildup creates slippage, causing premature loosening.
Step 2: Sectioning & Bead Placement
Strategic sectioning is crucial for even, professional-looking results. Proper spacing prevents your installation from looking patchy or uneven.
How to section:
- Create a horizontal parting from ear to ear across the back of your head
- Divide this back section into 3–5 horizontal rows (depending on hair thickness)
- Create vertical parting lines down the back from crown to nape, creating a grid pattern
- Each square section should be approximately the width of a pencil
- Secure unmounted sections with clips
Bead placement tips:
- Space beads evenly: typically 0.5-1 inch apart for full coverage
- Keep beads close to the scalp (approximately 0.25 inches from the root) without touching skin
- Maintain consistent spacing for a professional appearance
- Leave at least 1-2 inches of unbanded hair at the ends for blending
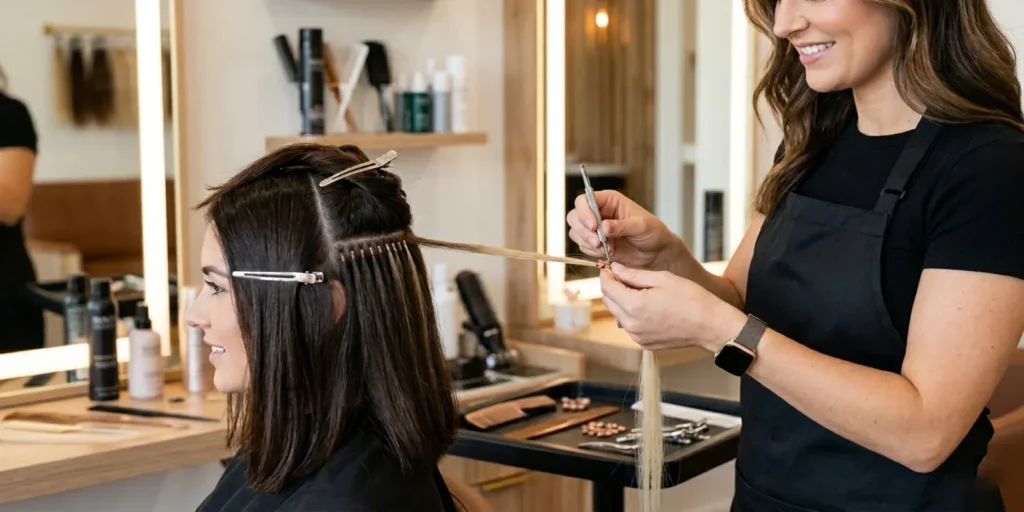
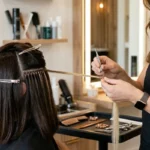
Step 3: Attach Extensions
This is where the actual attachment happens. Work slowly and methodically. This step requires precision.
How to attach:
- Take the first small section of natural hair from your grid
- Thread the loop tool through a microbead
- Use the loop tool to pull a section of your natural hair through the bead
- Grab the extension strand and thread it through the bead alongside your natural hair
- Both your natural hair and the extension should now be inside the bead
- Position the bead 0.25 inches from your scalp
- Use the microbead pliers to clamp the bead firmly, securing both strands inside
Important details:
- Ensure both strands are fully inside the bead before clamping
- Clamp firmly, but not so tight that you crush the bead or damage the hair
- The bead should be smooth and properly seated
- Double-check each bead before moving to the next section
Step 4: Blend & Style
Once all microlinks are installed, blend the extensions with your natural hair through strategic cutting and styling.
Blending steps:
- Let down all hair and assess the overall appearance
- Look for any obvious beads or visible attachment points; these should be minimal to invisible
- Trim extension ends to blend seamlessly with your natural hair length
- Create layers if desired for added movement and dimension
- Use a straightener or curling iron to match the texture of extensions to natural hair
- Add a texturizing spray or serum for blend completion
Final styling:
- Style your entire head (natural hair + extensions) as one unit
- Apply heat protectant before using hot tools
- Set with hairspray for longevity
- Sleep in a braid to maintain style and prevent tangling
How Long Do Microlinks Last?
One of the biggest questions people ask: How long can I actually wear microlink extensions?
Expected Lifespan: 2-5 months with proper care and maintenance.
The length of time depends on several factors:
Factors Affecting Longevity:
- Hair growth rate: As your natural hair grows, the microbeads slide down, loosening over time
- Maintenance routine: Regular care extends lifespan significantly
- Hair type: Finer hair may require earlier repositioning than thick hair
- Installation quality: Properly installed microlinks last much longer than poorly installed ones
- Lifestyle: Active lifestyles with frequent styling or heat use may shorten lifespan
Maintenance Schedule:
- Every 6-8 weeks: Schedule a tightening appointment to reposition microbeads as your hair grows
- Monthly: Deep condition and check bead security
- As needed: Reposition or replace beads that have loosened or become uncomfortable
Many people maintain microlinks for 6-12 months by regularly repositioning beads as natural hair grows. The extension hair itself lasts far longer than the initial 2-5 month estimate if you’re willing to maintain it.
Maintenance Tips for Microlink Extensions
Proper care is essential for keeping microlinks beautiful and secure. Neglect leads to tangling, slippage, and premature failure.
Washing Your Microlinks
Wash every 10-14 days or when product buildup occurs. Microlinks can tolerate more frequent washing than clip-in extensions, but less frequently than natural hair alone.
Proper washing technique:
- Use lukewarm (never hot) water
- Apply sulfate-free shampoo to your scalp and roots
- Gently massage shampoo into scalp without pulling on microlinks
- Rinse thoroughly with water flowing downward (never upward)
- Apply conditioner to mid-lengths and ends, avoiding the roots and beads
- Rinse completely with cool water to seal the hair cuticle
- Gently squeeze water out (don’t wring or twist)
- Air-dry or blow-dry on low to medium heat
Detangling:
- Always detangle from ends to roots using a wide-tooth comb
- Detangle while hair is damp or dry, never soaking wet
- Be extra gentle around microbeads to avoid pulling on natural hair
- Apply a leave-in conditioner or detangling spray for easier combing
Avoiding Product Buildup:
- Use only lightweight, extension-friendly products
- Avoid heavy oils and butters that accumulate on the hair shaft
- Use dry shampoo sparingly, as it can create buildup around the beads
- Clarify hair monthly with a diluted apple cider vinegar rinse
- Skip products containing silicones, sulfates, and alcohol
Nighttime Care:
- Sleep in a loose braid or bun to prevent tangles
- Use a silk or satin pillowcase to reduce friction
- Consider a silk sleep bonnet for added protection
- Never sleep with wet hair in microlinks
- Avoid tossing and turning excessively, as this causes tangling
Regular Adjustments:
- Schedule professional tightenings every 6–8 weeks
- Your stylist will reposition beads as your natural hair grows
- Adjust beads that have loosened from daily wear and tear
- Replace any damaged or compromised beads
- Monitor bead security weekly, gently pull on a few to ensure they’re tight
Common Mistakes to Avoid
Learning what not to do is crucial for successful microlink installation and wear.
- Improper Bead Spacing: Spacing beads too far apart creates gaps in coverage. Spacing them too close together creates an unnatural look and adds unnecessary weight. Maintain consistent spacing of 0.5–1 inch for balanced results.
- Over-Tightening Microbeads: Clamping beads too tightly can crush the hair inside, causing breakage and damage. Clamp firmly, but gently, you should hear a soft “click” rather than a loud crunch.
- Installing on Unwashed Hair: Hair with product buildup causes microbeads to slip. Always install on clean hair (shampooed 24 hours prior). Build-up prevents secure clamping.
- Neglecting Maintenance: Skipping regular tightenings is the #1 cause of failed microlink installations. If you’re not willing to commit to maintenance every 6–8 weeks, microlinks aren’t right for you.
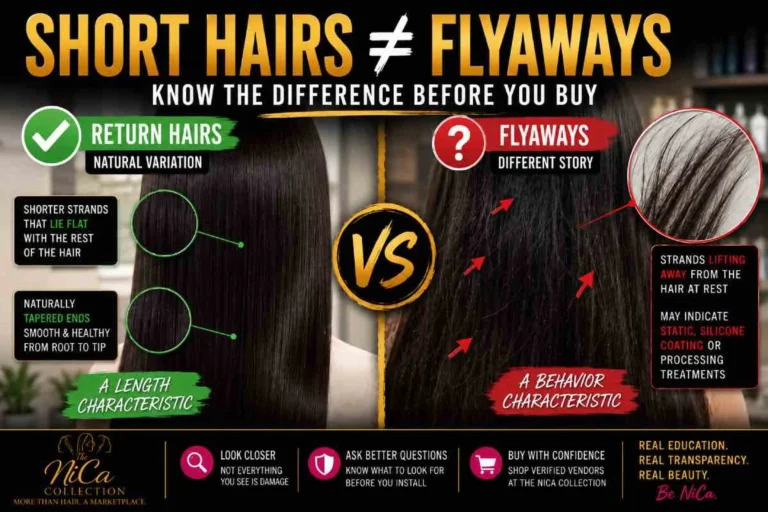
- Poor Hair Selection: Using low-quality extension hair leads to tangling, matting, and poor blending. Always choose premium human hair from reputable vendors. It’s worth the investment.
- Pulling or yanking on Extensions: Aggressive handling strains natural hair and loosens beads. Treat microlinks gently, especially during detangling and styling.
- Using the Wrong Hair Type: Installing microlinks on very fine natural hair can cause damage due to the weight. Microlinks work best on medium to thick hair.
Who Should Choose Microlink Extensions?
Microlinks aren’t right for everyone. Here’s who they work best for:
Ideal Candidates for Microlinks:
Medium to Thick Natural Hair: Microlinks work best when you have sufficient natural hair to support the weight and hold the beads securely. Fine or thin hair may struggle with the heaviness.
People Seeking Natural Appearance: If invisible extensions are your priority, microlinks deliver the most seamless look available.
DIY Installation Enthusiasts: With patience and proper instruction, microlinks are learnable for people willing to invest 4–8 hours on their first installation.
Long-Term Extension Wearers: If you plan to wear extensions consistently for 6+ months, microlinks’ reusability makes them economical.
Budget-Conscious Individuals (Long-Term): While upfront costs are higher, the ability to reuse hair makes microlinks cost-effective over time.
NOT Ideal For:
- Very fine or thin hair: The weight may cause damage
- Scalp sensitivity: The proximity of beads to the scalp may irritate sensitive scalps
- Low-maintenance seekers: Microlinks require ongoing commitment
- Short-term wear: If you only want extensions for a few weeks, clip-ins are better
- People with dandruff: Bead placements may irritate flaky, irritated scalps
If you fall into the “not ideal” category, explore alternatives like clip-in extensions or tape-in extensions instead.
Final Thoughts on Microlink Hair Extensions
Microlink extensions represent one of the most sophisticated, natural-looking extension methods available today. They offer the perfect balance of durability, flexibility, and aesthetic appeal, making them an excellent choice for anyone serious about beautiful, extended hair.
The key to microlink success is three-fold: proper installation, quality hair selection, and consistent maintenance. When all three elements come together, you’ll enjoy months of gorgeous, natural-looking extensions that move and flow exactly like your own hair.
At The NiCa Collection, we connect you with verified vendors who understand that quality matters. Premium human hair microlink extensions outperform synthetic alternatives significantly. Look for vendors offering:
- Raw or minimally processed hair for maximum durability and natural appearance
- Detailed texture and length specifications for accurate matching
- Transparent sourcing information so you know exactly what you’re investing in
- Customer reviews and ratings that reflect real experiences
Whether you’re installing microlinks yourself or working with a professional stylist, starting with premium extension hair from a trusted vendor makes all the difference.
Ready to transform your hair with microlinks? Explore The NiCa Collection‘s curated marketplace to find premium microlink-compatible hair from verified vendors. Our intelligent matching system helps you find exactly what you need by texture, length, density, and quality grade.
FAQ: Microlink Hair Extensions
Q: What are microlink hair extensions?
Microlink hair extensions are semi-permanent hair additions installed using microbeads as anchors. Each extension strand attaches to a small section of your natural hair through an individual bead, creating a lightweight, natural-looking installation that allows your hair to grow freely while wearing extensions. They’re durable (lasting 2–5 months with maintenance) and reusable through multiple installations.
Q: How long do microlinks last?
With proper care and maintenance, microlink extensions last 2–5 months before requiring repositioning. However, regular tightenings every 6–8 weeks (as natural hair grows) can extend this to 6–12 months or longer. The extension hair itself can be reused indefinitely when maintained properly, making microlinks economical long-term.
Q: Are microlink extensions safe?
Yes, microlink extensions are safe when installed and maintained properly. They use no heat or glue, reducing damage risk significantly. However, improper installations, such as over-tightening beads or poor sectioning, can cause hair breakage or scalp irritation. Work with trained professionals or follow detailed guidelines if installing yourself.
Q: Can beginners install micro-link hair extensions?
Yes, beginners can install microlinks, though it requires patience, proper tools, and detailed instructions. The process takes 2–8 hours for a full head installation. Many people successfully DIY their first installation by following step-by-step guides and watching tutorial videos. Professional installation is always an option if you prefer expert results.
Q: What is a microbead weave?
A microbead weave is a microlink variation using wefted extensions (multiple strands sewn together) instead of individual strands. Your natural hair is cornrowed into small sections, and extension wefts are secured along the braids using microbeads as anchors. This method provides fuller coverage and often lasts longer than individual I-tip microlinks, making it ideal for complete hair transformations.